Face it, we’ve all been there. The script you’re given to use isn’t clean. Even if the person who copied it did manage to get every word on the page (a challenge for some), there are likely some photocopier marks or the edge of the page is visible, and it’s just not pretty. Perhaps you also wish it had bigger margins or bigger font. Or the hardest for stage managers: someone copied the flat open book as one page and now you’ve got both tiny print AND two pages on one piece of paper, with no room to write within. You could take the time to make your own single-sided copy, and even painstakingly create a paper template on the copier glass to make it all line up all pretty….but who has time for that, especially if others may want to use the same copier?
Before I go any further, yes, it is a tricky topic that our industry tends to photocopy and scan scripts for our own purposes. In many of my online communities, we strategically never admit to having a copy of a script, and only communicate that by private message if someone asks. (You also run the risk that your production is using a newer licensed version than the one you receive, has different pagination, etc….ahem. See previous blog post.) Some publishers have now started sending a “stage manager’s script” that you’re supposed to use, but no thank you. It’s not punched on the side that I like it for starters. I’m not that into having a whole editable script like some, but I do like a nice clean script.
So, how can you clean up a messy script? The smartest investment I made a few years ago was to purchase the educator-discount version of Adobe Acrobat Pro 2017 when I was working at a theatre connected to a university. If you are a freelancer, I recommend getting the downloadable version; if you leave the institution and are using a subscription-based version, you’ll lose the program. I get no kickback from recommending this product, and later in the blog I’ll list a couple other free and/or universally used products that can also be used. However, Adobe really has a lot of useful features, and it’s what I use now. I’m all ears for a less-pricy product that has the same features, but this blog will at least explain my process to you.
Using Adobe Acrobat Pro to Clean a Scanned Script
Open up your script in the paid version of Adobe, and then start off by selecting Tools > Enhance Scans. You’ll then have a choice of Scanned Document or Camera Image. Choose Scanned Document. Note, this worked when a friend had a publisher’s view to his script, with those hashmarks of where it should be cut on the edges. The point is, your document is primarily text based, not image based, which you would like enhanced.
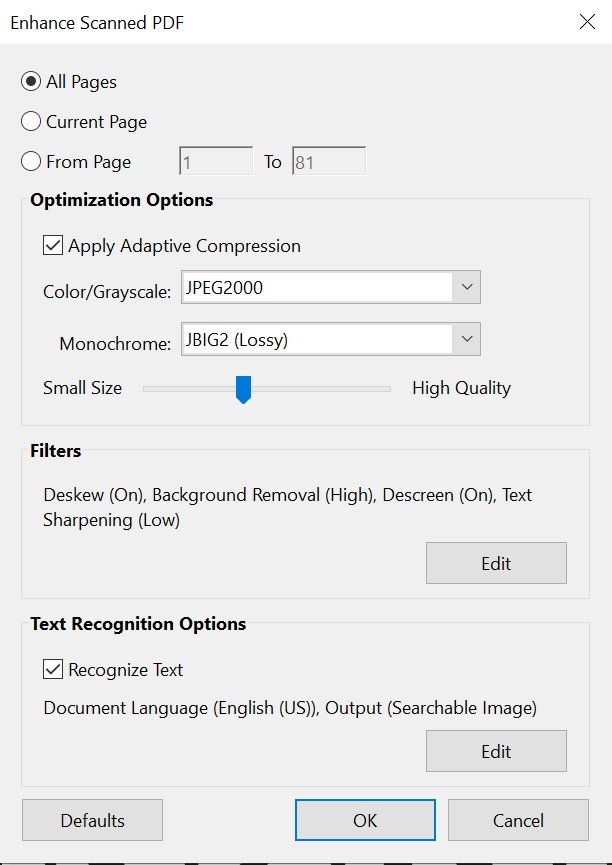
You can adjust the settings for this feature, as pictured below. Make sure you select All Pages, that Deskew is On (goodbye crooked pages if possible), Background Removal is High, and that you’ve checked Recognize Text. You can also choose whether you want to apply compression to the file to make it smaller.
After you select this tool, you will see a notification that it is switching between Optimizing and Scanning for every page. You might want to walk away and refill your water while this happens, as it can take a couple minutes. Afterwards, take a look and see if you can see any noticeable changes (or if something went awry at all). In the case of the publisher’s version I mentioned, this process alone took away those cutting hashmarks. It still left some large circles at the top and bottom of every page. For copied scripts, some marks may go away, but likely not all.
Next up, select Tools > Edit PDF. Again, you’ll watch it scan every page, so take another drink of your water and sit back. The notifications will bounce between “Performing page recognition” and “Converting scanned page to Editable Text and Images.”
Note, at this point it will turn every line basically into its own text box with selectable text. This is especially great if you want to copy the wording over for any reason. I can grab them for line notes, script change pages, or the occasion I want to expand the page in Word if I have a lot of cues on one page and want to spread them out to two pages. It’s not ideal for transferring the whole thing to Word though. More on that later.
By this point, hit Save As if you haven’t already, and give it a new title so you still have the original around. Likely, you still have book seams and some other extra marks showing you want to remove. I recommend starting by clicking in the background area – it usually thinks there’s an image there to select, then Delete. Did anything change? Sometimes it simply turns what you hadn’t realized was a slight gray tinge to now the plain white of Word backgrounds. For the publisher’s script version I cleaned, deleting one layer caught three of the four dots. If I clicked the remaining dot at the top, I could delete it as well. At 81 pages, each took two clicks. A little time consuming, but ultimately not that bad, and so much prettier.
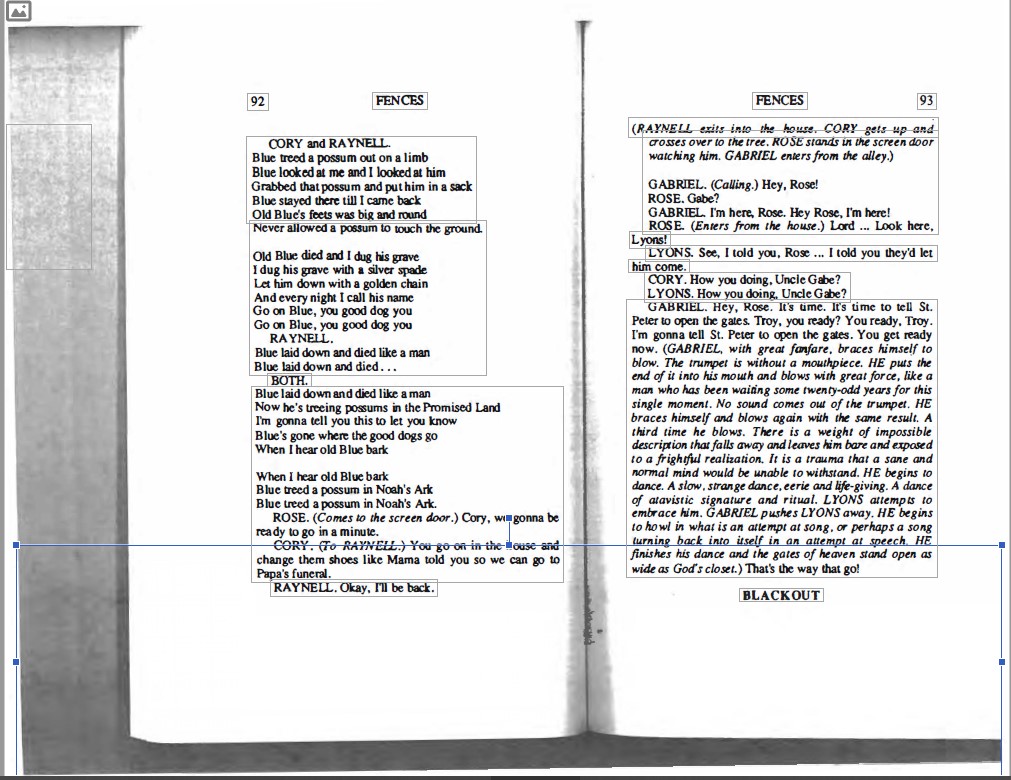
If there are major shadows from copying a book, you likely have several individual images you’ll need to remove. Below is a sample of what a scanned page looked like after applying the Enhance Scan and Edit PDF options. Note that there are text boxes around each line of dialogue, and there are also several places where you can see image boundaries for some of the copying shadows.
Delete any extra images. I found exactly 7 images (the gray lines of edges and book seam) to delete to turn the above image into this cleaner script.
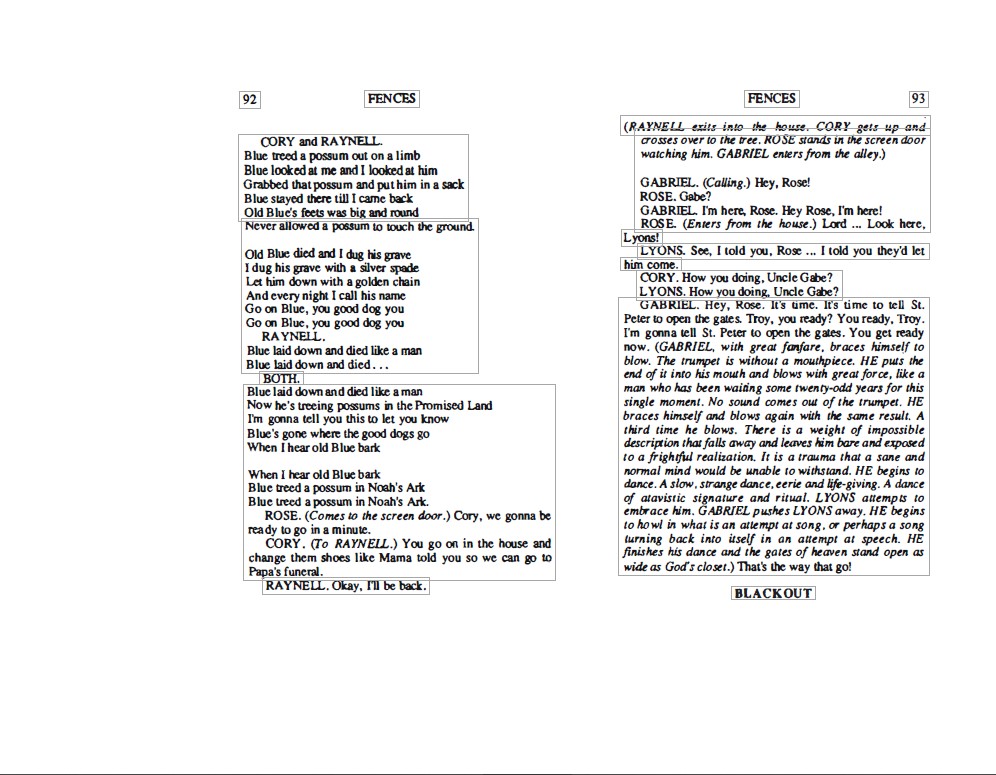
Ah…isn’t that nicer on the eyes? You could give this alone to the actors if they desire, or those that want to save paper. If your image was already one page, you’re likely done with any editing needs. If you want to adjust the margins, keep reading. Note, Adobe Acrobat does have an option to export your edited PDF to Word, but I’ll warn you the formatting is NOT pretty on the first go in my experience. But you can fiddle with that too if desired.
What if it’s a Two-Page Script View?
Of course, I wasn’t satisfied yet with the above image. I want each page separately. I’ve looked around for other ideas of how to do this. It takes a little bit of time, but here’s how I did it on my last show. I’d love to know if you have a shortcut or feature I haven’t caught.
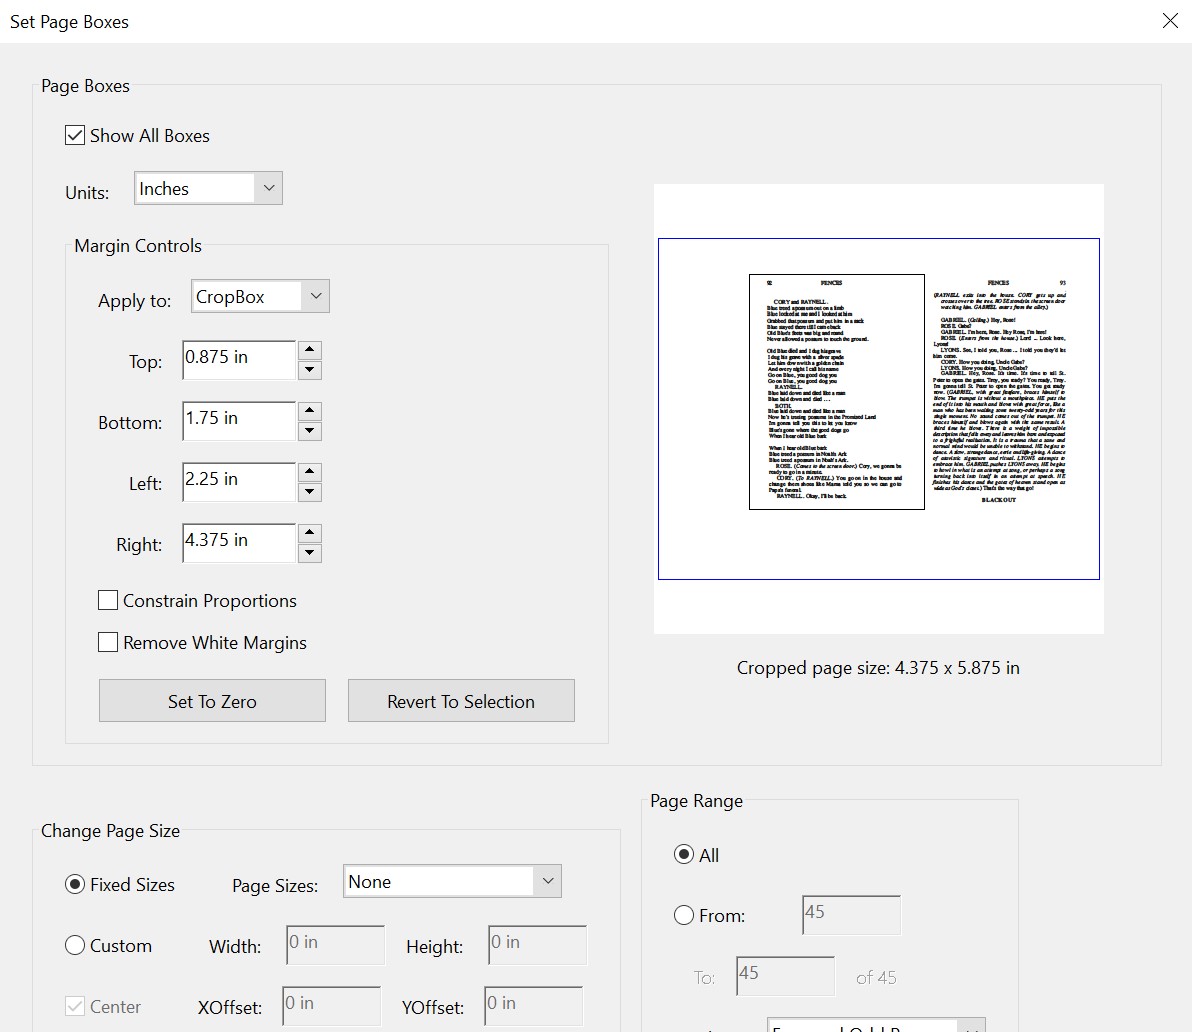
Select Tool > Organize Pages. In the toolbar are options to Delete (Trash Can icon), Extract or Insert a page, a few other choices and then “More.” Within the More dropdown, select Set Page Boxes. Here a preview will pop up of the page you are on. Focus on one of your two original pages, so in the image below, I’m working on creating cropped versions of the left-hand page. Give yourself some wiggle room in case they weren’t all copied exactly the same for every page, but still trying to keep away from the right hand page. At the bottom right, select Page Range – All.
Once you have set these options, go back to look at the thumbnails it gives you for each page. If they weren’t all scanned in exactly the same spot, you can go back and adjust pages individually. Make sure that instead of “All Pages” you click the next one down, which will default to the single page you’re on (ie, page 15 to page 15).
At this point, I will save this document as “Show Script – Left.” Then I go back and adjust the Page Box to the right side and give it the same title but with Right.
And now is when it can get tedious; you’ll need to combine the two left and right documents into one [File > Create > Combine Files into a Single PDF]. Unfortunately, it’s going to put all your left pages first, and then all of your right pages. Not ideal. If you are in the Organize Pages tool, you can drag pages around to the desired order. What helps me keep track of the tiny thumbnails, if I can’t read the page numbers easily, is to add in a BLANK page at the point where I’m inserting pages, as well as the beginning of the second type of page. So, if I have 1 2 3 4 5 BLANK 7 9 11 13 15, then BLANK 6 8 10 12 14 16, I can quickly find number 6 after the second blank, and drag it to be in front of the first blank page. It can take a while and your eyes can go crossed for a bit, but in reality, you’re only moving about 50 pages in a 100 page script. Delete your blanks when finished, go out of the Organize Pages tool, and see if you got them all correctly.
Bonus: Choices on margin size
Because you’ve likely cropped various sides of your script, you have the option to “fit to print,” print at actual size, or a custom scale to make your own margin size around it. Fit to print will give you larger text (but perhaps no margins), and actual size will give you the biggest margins. For a recent two-pager, I found a custom scale of 130% gave nice larger text but still lots of margin around all sides. Print a couple test pages to your liking. You can even save these choices as options for others by choosing “Adobe PDF” as your printer, and it will save with the new margins for everyone else to not have to think about when they print, which you can give a new document title. This blog post was actually written in part because a fellow stage manager at my summer job saw my “Show Title Cleaned Larger Margins” and “Show Title Cleaned Larger Text” files in our shared company Dropbox, and wanted to know how I did it.
What if you don’t own Adobe Acrobat Pro?
If you don’t own the program (or have a friend with one willing to help you out), there are a couple other options.
DocHub
I recently learned about DocHub. This web-based program is free after registering with your email. There aren’t a lot of bells and whistles, but they do have a “whiteout” feature that essentially builds big white text boxes. As I recall, you can also do this in the free Adobe Reader program, as long as you make the text box with a white fill and no outline.
Combining Free Adobe Reader with Microsoft Word
I’ve used this process when creating a digital calling script for Nutcracker, using a scanned score. In the free version of Adobe Acrobat, you can use the Snapshot feature [Edit > Take a Snapshot] to drag an outline for the image you want to copy. Better than taking a screenshot, you can drag your cursor below what is currently visible on the screen before letting go. Alternately, you can click on a single page and select it in its entirety if you like. Copy/paste that image into a Word document that you’ve set to your own margins. When you paste, Word will adjust the image size to the largest it can be within those parameters, so this is one way to give yourself bigger margins too. You can see how I then used a variety of text boxes, including transparent colored ones to highlight music notes to create my script by checking out this digital script sample. (Essentially, I’m mimicking using my FAVORITE flaglets from Daiso, to note exactly which beat a cue should be called.)
A quick and dirty way that could also possibly work is to right-click the PDF in your file folder, and choose “Open with…”. Microsoft Word will not show up immediately, but can be found under More and then other Apps. It can take a long time to generate (there will be a tiny status bar at the bottom of the screen, when you think your computer has frozen), but I just tested it with a single page of Nutcracker and it worked. I prefer the above method so I can adjust the margins as I like, but would work too. You could then reduce the image size of each page to fit on the page better.
What program do you use to clean up a script? What features have I missed in the above blog that would be helpful to add? Please comment below…and enjoy a script that’s easier on your eyes!
Comments from Others
Well, hmm. I’ve got a ticket into my website host to help me figure out why the new firewall isn’t allowing comments. Others have begun to comment on the posts I’ve made on social media with the link to this article. There are certainly many people who are in to typing it by themselves. More power to them and they like to spend their prep differently than I do! Anyway, here are some additional recommendations from the stage management social media hivemind:
Tessa V.: I recently discovered Sejda.com when I needed to clean up a document. They have all sorts of automatic tools to edit, split, and descew PDF’s. You just drop the pdf in and it takes a few minutes. They have a premium version but for free you can edit 3 documents up to 100 pages per hour.
I’ve used it to descew a score recently in a pinch and it worked great. They also have some good security measures and automatically delete documents.Jonathan F.found more on the same website:https://www.sejda.com/split-pdf-down-the-middle
This site allows you to split PDF pages down the middle, and orders them for you properly too, so you avoid a bit of the Acrobat PDF merging kerfuffle. There’s less fine-tuning in terms of cropping the PDF page, but for good scans where it’s not necessary to do massive amounts of cropping to fix the text, I imagine this would massively save the effort needed to do your method! [Note from Erin – looks great if it’s centered better than mine was, and yay on it properly ordering it.]
Madelyn S.: I’ve taken to using a PDF OCR (Optical Character Recognizer) tool online, since I don’t have access to Adobe anymore. I’ll run it through that, make it a Word doc, then clean up after. I tend to keep a digital book, and work a lot with new work, so being able to directly edit the text in my SM book is a huge plus. I usually use InvestInTech’s tool for it, which doesn’t have too many errors!
Ben W.: Personally I’m a Re-Type person using Styles in Word to create standard formatting and an easily searchable doc. I do this as early as humanly possible, even before prep, so designers are working off what I want to use myself. I match pagination exactly, then create a second version for my tech script where I customize pagination and cut stage directions. It’s a full day’s work but I love the results down the line.
But also LOVE your approach to cutting apart a two-page spread. Thanks so much for sharing! I have a super part time educational job I keep mostly just to retain a free Adobe subscription.Justin J.: I like having an editable script. I like being able to type my blocking and cues into it.
With PDFs (even scanned copies) you are able to convert them to a Google Doc in the Google Drive. You’ll need to go back and do some clean up work, but all the text should convert. I normally break acts up into two parts because the converter gets tired if it tries too many pages at once.
Shelli A.: Scan to PDF, use an OCR converter, like this one: https://www.onlineocr.net
Robin G.: I’ve done a few things over the years. Usually, I just re-type. I’ve also taken it into Paint and cleaned it up with the big white boxes.